Onboarding Checklist
After completing the signup flow, use the onboarding checklist to guide you through essential setup tasks to get your channel ready for launch.
Where to find it: Open /onboarding in your creator app, or use the link when you Launch your channel (you may be prompted to complete the checklist first) or from Channel Settings (e.g. launch site or advanced settings).
Overview
The onboarding checklist helps you complete all the necessary steps to set up and publish your channel. There are 7 required steps that must be completed before you can publish your channel. Each item guides you through a specific task, with direct links to complete actions.
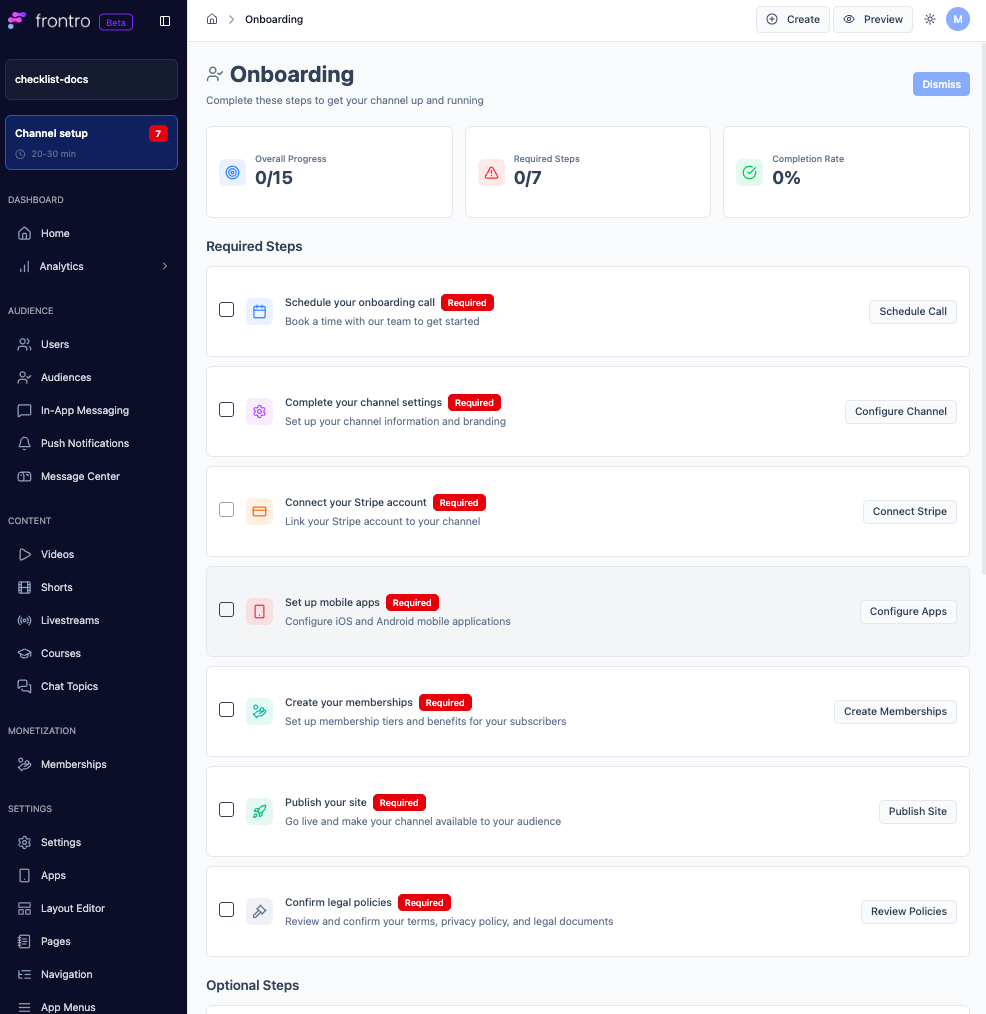
Required Steps
1. Schedule Your Onboarding Call
Book a time with our team to get started.
- Action: Click "Schedule Call" to open the scheduling calendar
- Completion: Manually mark complete after scheduling
What to expect:
- 30-minute onboarding call with our team
- Overview of platform features and capabilities
- Guidance on setting up your channel
- Best practices for getting started
2. Complete Your Channel Settings
Set up your channel information and branding.
- Action: Click "Configure Channel" to navigate to channel settings
- Completion: Manually mark complete when finished
What to configure:
- Channel display name and description
- Profile image and logo
- Brand colors and theme
- Contact information
3. Connect Your Stripe Account
Link your Stripe account to your channel to enable payments.
- Action: Click "Connect Stripe" to begin the connection process
- Completion: Manually mark complete after connecting
Setup includes:
- Stripe account connection
- Payment method configuration
- Tax and billing information
- Payout settings
A Stripe account is automatically connected to your Frontro account. Click "Connect Stripe" to claim your Stripe account and complete the setup.
4. Set Up Mobile Apps
Configure iOS and Android mobile applications for your channel.
- Action: Click "Configure Apps" to access mobile app settings
- Completion: Manually mark complete when finished
Setup includes:
- iOS app configuration
- Android app configuration
- App store listing details
- Push notification settings
5. Create Your Memberships
Set up membership tiers and benefits for your subscribers.
- Action: Click "Create Memberships" to configure your membership offerings
- Completion: Manually mark complete when finished
What to configure:
- Membership tier names and pricing
- Benefits for each tier
- Access levels and permissions
- Trial periods (optional)
6. Publish Your Site
Go live and make your channel available to your audience.
- Action: Click "Publish Site" to publish your channel
- Completion: Automatically marked complete when your site is published
You must complete all other required steps before you can publish your site.
7. Confirm Legal Policies
Review and confirm your terms, privacy policy, and legal documents.
- Action: Click "Review Policies" to access legal policy settings
- Completion: Manually mark complete after reviewing and confirming
What to review:
- Terms of Service
- Privacy Policy
- Cookie Policy
- Any additional legal requirements
What's Next?
After completing your onboarding checklist:
- Settings - Continue customizing your channel settings
- Content - Upload content and build your library
- Builder - Customize your channel's appearance
- Monetization - Optimize your revenue streams
- Analytics - Track your channel performance
Need help completing your onboarding checklist? Contact our creator support team for personalized assistance.